Wednesday, 20 March 2013

Studio Photography Brief: Final 3 still lives and Evaluation.


This post is dedicated to discussing how I made (and selected) my three remaining still life images for submission: flower, glass and jewellery.

Glass

Glass is said to be one of the most difficult things to photograph, and it is said that we are not actually aiming to photograph the glass itself, rather the reflections and the shadows that come from them, to ensure the actual glass stands out. We were shown a number of different techniques (and used a range of different media and props) during this session, but I opted for the simple blue glass bottle and green mottled glass paperweight set against a white background (below).

Camera Settings:  f11, 1/100th, ISO100, 62mm, WB: Flash.
Lighting: two soft boxes directed at subject from either side; one deep reflector underneath subject, at an angle pointing upwards; black card to either side of subjects.

I wasn't able to find an icon for the glass table. My Apologies.

I suppose this set-up is similar to the one for the Action Man 'still life', in that it has one very light aimed at the subject (in this case deep reflector under the glass table), along with two soft boxes. The main use of the soft-boxes here, however, was to provide a soft and even light to the glass from both sides with minimal reflections. Commercial product photographer, Alex Koloshov, suggests using a strip soft box to create a vertical catch-light as opposed to the square we see in my subjects (1). The use of any other modifier would be sure to render the edges and highlights too harsh, which is why the deep reflector is placed under the glass table, directing the light through the whole glass. The black reflectors either

As always, I opened the image in Adobe Camera Raw first to increase the Contrast, Lights and Highlights (keeping an eye on the 'clipping' of these), and also increased Shadows (to make the reflection on the table more prominent) and Darks (the texture of the mottled glass needed accentuating in my view). In Photoshop, I used two Brightness/Contrast layers with black masks (Alt + mask): one to ensure the white background was absolute white- painting in the bottles with a white brush so they wouldn't be too bright- and the other to accentuate the reflection of the bottles in the table. The last thing was convert the colour profile to DS Lustre, and brighten the image by +30, ensuring the correct brightness once printed. 

I did try other subjects/compositions before this one, but they just weren't strong enough. Below are just some of these.

The same subjects shot using a black background didn't have nearly the same effect. For one, the black highlights the dust on the table, and the image lacks the clinical feel.


This was one I began editing, before washing my hands of it and opting for the one I finally chose. It just goes to show you can come back to images and see them in a different light (pardon the pun), for I revisited it just now and finished editing it, darkening the background and revealing the edges of the bottle for definition with the use of a mask. The two soft boxes make for some brilliant catch-lights.


Flowers

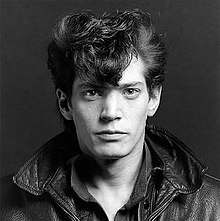
  I've already shown some of Mapplethorpe's flowers, and the personality he managed to inject into them via his unique style. We also looked at Irving Penn's (1917-2009) work on the subject, whose work I was familiar with from Level One. Flowers are not something I'm naturally interested in, but once I noticed Penn's concentration on dead and decaying flora (in enlightening compositions), I knew the concept was something I could get my teeth into. I have included some examples below, along with my annotations as a way of 'segwaying' into my own choice.


Much like Mapplethorpe, Penn gave flowers their own unique personalities. Here three dead Gerberas huddle together like models, almost conscious of the process of photography they are subject to.


Again, the dying flowers are almost aware of their certain fate, as they face death, albeit still conscious and bashful as models in front of the lens. They are being subjected to something. Makes me think whether- in photography- there is more life in dead flowers than with those that are alive. In the words of the art critic Rosamund Bernier, Penn brought "poetry to immobility" (2)

One thing present in all the subjects in his seminal book on flowers is the lighting used. He was renowned for using minimal backgrounds, and for me this only serves to highlight the perfect blend of softness, definition and contrast as a way of evoking the splendour of a flower's texture.


  Texture was what I decided most interested me in our flower sessions. It was the texture of a rose I submitted (below), which was shot using one of the college's Medium Format cameras, the Mamiya RZ67 with a 17MP digital Leaf Valeo back, for extra clarity (perfect for highlighting the rose's texture).


Camera Settings:  f5.6, 1/125, ISO50
Lighting:  Light above subject (opposite camera) with barn-doors and honeycomb attached; beauty dish to left of camera to highlight flower; gold reflector to add warmth to the highlights (below).


The barn-doors ensures the light glances over the flower, highlighting its texture; the honeycomb diffuses said light,, preventing it from being too harsh.
It was the spiky death of this flower that so attracted me to it. Death has long been celebrated in art, and here I sought to highlight the beauty of it, reminding us that death is part of life. Looking at the print now, I notice an almost Tim Burton (Nightmare Before Christmas) feel to it, the way the textured green of the main petal (accentuated by increasing Vibrancy and Saturation) seems to be stretching in animated fashion, covering its head to preserve its dignity. There could also be parallels drawn between this and William Blake's illustration that accompanies the poem 'The Sick Rose', included in his Songs of Experience (below). 


I certainly think there is a project in here somewhere:, which would involve layering (read: wrapping) Blake's text around my own rose in Photoshop. A possible contender for the Montage unit.
The only reservation I have about this image is that it is too bright, which I feel detracts the actual matte-like texture. Indeed, upon opening the TIFF in ACR, I noticed there was some clipping of the highlights, specifically in the upper red petal. I did attempt painting this away using the Adjustment Brush with a reduced exposure, but it looked too unnatural. I did take a few shots of this composition (below), but ended-up opting for the a brighter one.


This looks better on screen (more like Penn's lighting), but the main reason for upping the lights and highlights of the final (and lowering the shadows and dark points) was to ensure the print didn't come back dark. One day I'll get my screen calibrated. (This is edited by the way).

There were a few I did using a range of different compositions also, but way inferior to the final image (below).


The light seems to have picked-up the texture of the wood here more than the actual flower. The composition is dreadful too. It is pretty much just a dead flower. No poetry or sense of the aesthetic like the final one. Not edited.
Better composition here, but looking at a subject placed to the right of the frame makes me feel uneasy. And I feel the bud of the rose is too close to the camera. Still, at least its blossoming here.


I think I was finally getting somewhere here. A wider shot that includes the whole rose works a lot better. And the petals that have become detached from the stalk also make an extra focal point for the viewer. However, compared to my final one I think it lacks impact and drama. If the one above was too close, then this would be too far away, meaning we cannot engage with it as much.


The second part of our flower sessions were spent experimenting with different coloured gels, which were applied to the main key light (deep reflector) aimed directly at the flower in question. A lot of this stuff was done in the main studio space with my own camera and lenses. The set-up is pictures below.

Shooting table atop an ordinary table against a white backdrop; deep reflector with barn doors and honeycomb to my right; deep reflector with range of coloured gels (blue & green) applied; camera on tripod in centre.
Some of these came out quite well, if a little sparse and lacking in any objects to accompany the flower. Below are some of the ones I felt worthy of editing. Note how narrow the apertures I've used again (more about why this is in my Action Man still life post).


f20, 1/100th, ISO100, 75mm.
The subtle blue gel adds a nice tint to a red rose, possibly because we're dealing with the three main colours of the gamut in one image of an object of natural beauty (Red, Blue, Green). I opened this in ACR to bring out the contrast, shadows and darks (and also warmed the WB so the blue didn't dominate too much), but not much with lights and highlights due to the fact those within the inner petal were clipped to start with. I had the lights too bright. Still, nice image, just not good enough to submit.
f25, 1/100th, ISO100, 75mm.
The green gel doesn't work half as well as the blue gel because of the fact green is prominent in the subject to start with. Adding a blue to a green and red subject was a way of throwing a new colour into the range of colours, making them "gel" together (pardon pun). Way too green this. 


Jewellery


I wasn't exactly frothing at the mouth at the prospect of photographing pieces of jewellery. In fact it was my least favourite of all the still lives. Still, the aim of the unit is was to showcase a range of different media, so photograph jewellery I did. Below is my final choice, although I didn't have much to choose from.


Camera Settings:  f22, 1/160, ISO100, 60mm (on Nikon 60mm f1.8 macro lens). Spot Metering.
Lighting:  Honeycomb with barn doors from back (attached to backdrop); beauty dish from left of camera aimed 45 degrees at subject; gold reflector.    

Like the flower, the barn doors with honeycomb ensured a directional and diffused soft light from the back, whilst the beauty dish (along with its centre diffuser) gave a more prominent light to the subject, helping me to pick up the fine detail with the Nikon Macro lens. 

As with all still life set-ups, the background and any accompanying objects used in the shot were paramount. The first half of the session focussed on us going out into the great outdoors and collecting various bits and pieces that could would make the jewellery stand out. I was lucky enough to find a huge log, full of moss and countless amounts of interesting crevices and protruding bit. For extra interest I also chose some of the tree bark used by the college to decorate its tree-lined areas. This was all well and good, but my only criticism with this in my final shot was the similarity in colour of the log and the earrings I photographed. Below are some that gave a slightly better contrast between subject and background.


Note how the silver and stones stand out more against the brown log background.

Although the composition leaves a lot to be desired here, again the pendant stands out a lot more against the background. This was never going to be a final choice, mind, for the subject lacks the warmth of my chosen one. This is because I had not yet brought the gold reflector into the mix.

I think it may just have been the poor choice of subjects that turned me off this particular studio session. I mean it stands to reason that students are not going to leave their best jewellery at college for people to photograph. And so, just as a bad workman blames his tools, I am fully prepared to blame the shoddy subjects for what I deem uninteresting or garish images of jewellery (below). 


Too plain. Can tell its one of my first efforts. Don't think the breeze block does much for the subject either. A breeze block is more associated with 'urban chic' like a modern watch or something.


This is not as bad as I'm making out. If only the edge of the shooting table wasn't in the frame. I think warming the White Balance considerably in ACR does a lot for a jewellery image.


Wow! Where did this one spring from? I certainly hadn't noticed this when I was choosing one to print. Had I my time over again, I would have opted for this instead: there's a lot more going on (with the different shapes and textures), and the composition works on the 'rule of thirds' basis.

Overall, I feel I have learned lot from our studio sessions, but conversely I don't feel I have scratched the surface in things I wouldn't mind trying. I'd like to spend more time in the studio with a range of different subjects, making best use of different lighting techniques. I'd really like to push new ways of doing things, and try different combinations of lights. Its like cookery in this respect: its all well and good following the instructions to the letter, but at the end of the day, the best dishes succeed from bringing one's own flavours to the ingredients. Needless to say, these sessions have really whetted my appetite for more experimentation in the future. 


1) http://www.pixiq.com/article/product-photography-tipstricks-shooting-glass-on-black
2)  http://www.latimes.com/entertainment/news/arts/la-me-irving-penn8-2009oct08,0,1536282.story?page=2

Monday, 11 March 2013

Studio Photography Brief: Final 3 portraits & Evaluation


The culmination of many weeks practising the photographing of various subjects, objects, models and textures etc in the studio, finally resulted in the submission of between 5 and 7 images, each encompassing one of the genres we had spent time practising. Due to how happy I was with the various portraits I had shot (and owing to a bout of amnesia in not being able to remember how I had shot some of my earlier still lives) I chose to submit three portraits, three still lives (glass, flower and jewellery) and the Action Man set-up that apparently counts as a still life in its own right. I will be discussing each of these in detail below, drawing attention to lighting and composition, equipment used and the thinking behind the particular mood I was after (NB: the Action Man shot has its own post dedicated to it).

  Since my previous post dealt with the work of Robert Mapplethorpe in its various thoughts, I thought it only right to start this post by discussing the portrait I produced of my classmate Noreen using what is apparently the Mapplethorpe style, of using two soft boxes either side of the camera directed at the model, a hair light (preferably with a honeycomb attached), and two black reflector boards at either side of the model. Below is the resulting image, but- as per my previous brief posts- I will do my best to detail how I got there by way of including previous images from the same shoot.

Camera Settings: f8, 1/100th, ISO100, 50mm.
Lighting: Two soft boxes either side of the camera, aimed at model; one head (with honeycomb attached) behind model at waist-height pointing up towards hair (hair light).

This is the shot straight from camera. 
Add caption


You see how that the camera is positioned between the two soft boxes, and the two black reflector boards are there but there is no hair light at this point, which is why I have included a diagram below.

Here we have everything: both soft boxes, both black boards and the strobe used as a hair light.


  You will see from the final image that Noreen's face very illuminated amongst the black background. This is because the soft boxes keep things light and soft on the model's face, and the black boards retain the light in the area where she is stood. It took a while to decide how bright I wanted the soft boxes, and how narrow my aperture, so I remembered two pieces of advice that I always carry with me into the studio: 1) start at f11 (this is what a portrait photographer advised me to do a while back, and I'm also told that most lenses work best between f8 and f11) and 2) don't turn the lights above 3. The last point was what I learned during the Action Man/Rex shoot, for at the time I had the lights too high and using apertures as narrow as f20/22. Also, wanted a degree of depth to the face.

In Camera Raw, I increased the exposure by a stop, along with increasing the contrast and the highlights a touch. I lessened the shadows to ensure the hair didn't get lost in the black of the background. 

In Photoshop CS6, I removed any rogue marks on Noreen's face using the Spot Healing tool first and foremost. I then duplicated the background layer, selected a Gaussian Blur filter (6.6) and applied a black mask to the layer, allowing me to use the white brush (opacity 25%) to brush the blur back into her face to soften the skin incrementally. This would compliment the use of soft light from the boxes. I then converted the image to Monochrome using a Black and White Adjustment layer and adjusting the colour channels. However, after John Kiely's session on B&W on conversion, I returned to the Photoshop Document prior to printing to use Channels to highlight only the Red channel (for this is well-known to make female skin appear softer) and added re-added the B&W adjustment layer. I then reduced the shadows some more using Image>Adjustments>Shadows and Highlights, and increased the Brightness to +30 to ensure the print wouldn't come out too dark, as it has in the past. 

Earlier examples from the shoot

The early examples were using f11 without the hair light at the back, for I wasn't aware this was part of the Mapplethorpe set-up at this point. I started by using Mina as a model. Although work I do in ACR makes a hell of a difference (sometimes to the point of rescuing images), the hair had no real light or definition without use of a hair light (1). I then brought the hair light in, tilting down from above Mina's head, but I felt the light was too pronounced (2). Finally I placed the it right behind her head (obviously out of frame) to illuminate her head from the background, and this seemed to work a lot better (3). All three of these examples are below (ignore the compositions and expressions).

1
2
3

I repeated this technique with Noreen, but increased the aperture to f8 and brightened both soft-boxes by half a stop. If I remember correctly, the hair light would been a stop lower than the boxes. Below are the the first couple of Noreen with the hair light directly behind her head, but- with her being dressed in complete black (the thing that helped the image finally, I may add), as well as having jet black hair, it did nothing to pull her head away from the background.


  The next two portraits were shot using exactly the same lighting arrangement as one another. Let's take a look at them now:


Camera Settings:  f11, 1/100th, ISO100, 50mm.
Lighting:  Beauty dish (left of camera) directed at model; soft box to model's right (one stop lower than BD); black reflector to her left; black background.

Camera Settings:  f11, 1/100th, ISO100, 50mm.
Lighting: As above (model seated; lights lowered)- see below


  These two are not a million miles away from the Mapplethorpe style, but I knew the beauty dish aimed directly at the model would make for a crisper, more prominent light on the face, as opposed to the ultra-soft effects of the two soft boxes. However, I used a soft box to the right of the subject just to soften the harshness of the light (see 'Introduction to Studio Lighting') and ensure one side of the model's face was lighter than the other. Needless to say the black reflector helped a lot here, as it did in the shot of Noreen.

  The shot of Anita is one of the best portraits I have ever made. I shot a few of her during the session, but in many she was looking right at the camera. It was only until I started getting a lot more creative and confident in directing her that tried something different. Below are some of the ones I didn't opt for. In this instance, I am still very fond of them, but it was a matter of the final one or two eclipsing what had one before. 


Too smiley, but still a good, friendly shot.
Either look at the camera and smile or look mysteriously away from it. Never the twain. My opinion.
Nice, but the fact she look likes she's about to speak ruins it.
Other than the one I submitted, this was the only other I'd have chosen. She looks placid and relaxed, and the portrait benefits from her looking away.
Reason not for choosing: It lacks the majesty/sense of the regal of the other.
  
From the same session I also shot quite a few of Andrea, but I just didn't it anything fit with the other three models (below).


It may be an ethnicity thing. In my final choices I feel I have represented three women with different heritages, and I think the monochrome conversion only serves to highlight the skin tones of each. This adds another dimension to what I feel quite comfortable in calling a series: Anita the African Queen in all her majesty; Mina looking sophisticated and serious and Noreen looking mature and dominant, her face aglow by the way I shot/edited her. As good a portrait it is of Andrea, as relaxed as she looks, something didn't quite work for me when I put them all side-by-side.


Tuesday, 5 March 2013

Research for Studio Photography Brief: Robert Mapplethorpe


One of my images that I submitted for this unit was in the style of the famous and controversial New York photographer, Robert Mapplethorpe (1946-1989). I first heard his name in an interview with Bats for Lashes star, Natasha Khan, talking about why she went nude on the front of her recent album, The Haunted Man: "‘I always liked Robert Mapplethorpe’s photography: that tradition of raw depictions of the human body, rather than the airbrushed, lip-glossed “sexiness” you see a lot today" (1). I thought about this statement, and I was intrigued by the man who influenced the album cover below:

The album cover for The Haunted Man by Bats for Lashes, posed by their lead singer, Natasha Khan (2012).

It wasn't long before I heard his name again: this time whilst having a conversation with one of the tutors on the course. By now it was quite evident to me that Mapplethorpe was "the guy that did nudes". Motivated by intrigue, I took a look at some of his work, and could see immediately where Khan got her ideas. 


His nudes appear to be more than just photographs; rather complete studies of the human form, shot in monochrome to elucidate each muscle and sinew in a range of poetic compositions. He began shooting in polaroid, but it wasn't until acquiring a Hassleblad Medium format (which he used to shoot his inner circle from the New York gay scene) that his work came into its own. Above I used the word 'controversial', a word often bandied about when someone attempts to do something outside the confines of what is regarded as acceptable at that time. It is a word often used in the art world, along with accusations that an artist's sole intention is to shock audiences (2):  "I don't like that particular word 'shocking.' I'm looking for the unexpected. I'm looking for things I've never seen before … I was in a position to take those pictures. I felt an obligation to do them" (3).

Along with his nudes, he was also renowned for his interesting depictions of flowers, almost affording them the same characteristics as his work on the human form, and shooting them in similar thought-provoking compositions. After all, they are living forms:

This one seems to be about the interplay between the two flowers, almost as if they are in relationship, the top one yearning for the other like some medieval damsel.
The shadow is very strong here, making an everyday flower appear like some demonic presence (with horns).

He was also renowned for compiling a series of head-shots of famous people at the cutting edge of the New York scene around the same time, and known for his own trademark style in shooting these portraits. Indeed, for this brief I spent a little time in the studio attempting to shoot my own version using this style. I will go into this technique in more detail in another post, but for now I will show another three examples; just to whet your appetite.


Watch this space!


1) http://metro.co.uk/2012/10/12/bat-for-lashes-im-in-a-more-joyous-mood-on-my-new-album-599375/
2) There may be a subsequent post on this issue focussing Andres Serrano, another photographer who is meant to "shock".
3) Robert Mapplethorpe quoted on his website: http://www.mapplethorpe.org/biography/

Introduction to Studio Lighting

One of the main reasons I signed-up to do the Level Three course in the first place was because of its dedication to studio photography (after there was very little in levels one and two). I've never been particularly technical minded, so I thoroughly appreciated the 'recce' session John Kiely gave us, where he took us into the studio, and- without switching-on any of the lights- talked us through some of the main ones we would be using, not to mention the power packs (quads) and other bits and pieces. I don't think I will ever forget Mr. Kiely's famous line: "the most important thing in a studio are the clips and gaffer tape" [paraphrases].

For our very first hands-on practical session we were asked to use a series of different modifiers attached to a single flash-head directed at a single subject, the point being to gauge the different effects said modifier makes. A modifier is any device added to the flash head to direct/diffuse/shape the light falling upon the subject. Here we used a Beauty Dish (or Soft light in this country), Deep Reflector, Snoot, Soft Box and Umbrella. I will give an explanation of each of these, detailing their different effects upon the subject, followed by an example of this from out initial session.


Deep Reflector

The Deep reflectors we were using had a silver interior. White interiors are also available. These make for softer-edged highlights.

f8, 1/80th, ISO400, 50mm.
Prominent highlights on Andrea's face, not to mention the shadow cast to the back of the subject on her left (see below for lighting diagram)


Beauty Dish 

The beauty dish is basically a medium-sized parabolic (1) dish, often shallow with a silver interior. Inside the dish is a tube cover, used to cover the flash tube, which diffuses the light and softens the shadows. Without the the cover it would be more a "shallow reflector", with a harsher shadow behind the subject.

The beauty dish is basically a medium-sized parabolic (1) dish, often shallow with a silver interior. Inside the dish is a tube cover, used to cover the flash tube, which diffuses the light and softens the shadows. Without the the cover it would be more a "shallow reflector", with a harsher shadow behind the subject.


https://blogger.googleusercontent.com/img/b/R29vZ2xl/AVvXsEhuwMRk68349oQP_IfjQRHeD36uZPdT9-6Zz9HPoAOVfhx5i8NlFOAhO_RfQ70fJCCpgdb1M9UJzsYnPD7XXJGmJcYLC4ADYL74BpJ_Z1o31deSL6-eoohzxGH3vi65ND-I2lDlqA6jvvHM/s1600/AmenaBeautydishTouchweb.jpg
f8, 1/80th, ISO200, 50mm.
The Beauty Dish focusses the light at the subject and creates a sweet spot where in the centre with it dropping-off around towards the outer edges. I've used a tight crop here with my Sigma 50-200, meaning you cannot see a lot of the shadow behind my model. However, I can vouch that it is a lot softer than the Deep reflector.

Snoot
http://i01.i.aliimg.com/photo/v0/107192523/studio_lighting_snoot.jpg
Looking at the shape of the thing, you'd think its effects are self-explanatory. The snoot is a full-on cone, meaning the light is directed and concentrated at a very small part of the model/subject, causing for an extremely harsh subject to fall behind. Way I like to see it, it is almost like shining a torch on the subject.

https://blogger.googleusercontent.com/img/b/R29vZ2xl/AVvXsEhYWZ4DcWpNPI6AV2HrQuWiS5TUkHlk_71tUS4dVbSlN60fqBp0CpEhU4YEncc06mDQiGZKVeuyvF0M2JRhyphenhyphenb4uwujZBL2wx8MsLtmrv_X5bfa436fzdyHMsj-DGmaBRG2JbDliJTKwIbor/s1600/AndySnoottouchweb.jpg
f11, 1/80th, ISO100, 50mm.
The snoot is used to highlight detail, in this case on the face of the model. It makes for a more intense look than the other modifiers, and as you can see above, the shadow is harsh with very clear edges, for nothing is softening/diffusing the light.

Soft Box
http://www.teamworkphoto.com/images/bowens/wafer75softbox.jpg
The softbox does exactly what it says on the tin (softens light)... And it is quite literally a box. It also ensures there are very little shadows cast by the subject. The fact they are square means they can cover large areas (they come in different sizes depending on the scene you are shooting), and are easy to recognise when shooting portraits, for there will be an illuminated white square both eyes of the model.

https://blogger.googleusercontent.com/img/b/R29vZ2xl/AVvXsEiQjg9miWFprXiUbxmR0nI5K0VVPQ_tUvuLoxlKIimLXYPemf6ZjZx874NfMDVdCshG0MeNqc-b3wyTByfIgnsNWv7VB0qqzU12kwZI9_iFAEKN8TzExeW6tX_kFnMvbV0IPlyWhP2i-h0o/s1600/MinaSoftboxTouchweb.jpg
f11, 1/60, ISO400, 38mm.
Note how the light appears evenly dispersed throughout the model's face, and how the shadow is hardly a shadow at all, but a mere "dropping off" of the directed light.

Umbrella
http://www.hawaiicamera.com/system/images/182/medium/umbrella-whiteblack.jpg?1270513766
Umbrellas can be used either as shoot through (where the flash head is covered by the umbrella) or reflected (where the head is aimed away from the model at the open umbrella). The latter is the most common, but the former gives a light very similar to a soft box because of the way the light is diffused.
https://blogger.googleusercontent.com/img/b/R29vZ2xl/AVvXsEjGx22HOQpQjPLeMyw7OinsFq7C3ollxFKuNuanIXg9v-DlM8MOIIWlt-9ScQ9xTFTObbmKruU5mW8TBcYafIoaFkdQsIH1wcgFdnZocJt5S_JhJF65o-XM0zkvccGOUnjdXFafAh4GDa3m/s1600/AndreaUmbrellatouchweb.jpg
f11, 1/80th, ISO200, 50mm.
Unfortunately, the tight crop means we cannot see the shadow (or lack thereof), but I think it is easy to tell how this gives a light very similar to that of the soft box. I actually really like this effect.

In subsequent studio posts I will discuss how I have used the modifiers mentioned here to light a range of subjects from models through to still life.
1) http://en.wikipedia.org/wiki/Beauty_dish
2) http://www.youtube.com/watch?v=w-cQyJWNvLY
3) http://www.youtube.com/watch?v=w-cQyJWNvLY